
Truecaller SDK offers one-tap login without the need for manual phone number entry or OTP verification. This simplifies the onboarding process, enabling users to sign in or register quickly and efficiently. The SDK automatically populates verified user details (such as name, phone number, and email) from Truecaller’s database, saving users the hassle of filling out lengthy forms and reducing drop-off rates during sign-up. It also reduces the cost involved in sending OTP SMS.
 In this article, we'll see how Truecaller SDK can be integrated in your android app's login flow.
Cheers!
Happy Coding 🤗

1. Truecaller Client ID
To get started, first you need to sign up on truecaller's developer page and get the Client ID.- Visit https://sdk-console-noneu.truecaller.com/sign-up and create a new account.
- Once the account is created, click on New Project and fillout the details.

- After creating the project, expand the Credentials section and give the app details like platform, package name and SHA1 fingerprint. If your app is on playstore, you need to give SHA1 fingerprint from play console. After filling the required details, the Client ID will be generated


- Expand the Consent section fill out the details
- Add Test mobile numbers to test the flow while the project in test phase.
- Once everything is filled, you can submit the app for approval if you think app is ready to be published on play store


2. Android Truecaller Login Flow
Once you have the Cliend ID generated, let's move onto android integration part.- Open the app's build.gradle file and add the truecaller dependency and sync the project.
build.gradle
dependencies { ... implementation "com.truecaller.android.sdk:truecaller-sdk:3.1.0" } - Add your Truecaller client ID to strings.xml
strings.xml
<resources> <string name="app_name">truecaller-login</string> <!-- Truecaller Client ID --> <string name="truecaller_client_id">mtaivooladzibn-aburiz4up06-dix5kjg9jlfye2p0</string> <string name="truecaller_cant_use_error">Truecaller login is not supported on this device!</string> <string name="truecaller_code_challange_error">Unable to use Truecaller login!</string> </resources> - Open AndroidManifest.xml and add uses-sdk, add INTERNET permission and add truecaller meta-data.
AndroidManifest.xml
<?xml version="1.0" encoding="utf-8"?> <manifest xmlns:android="http://schemas.android.com/apk/res/android" xmlns:tools="http://schemas.android.com/tools"> <uses-sdk tools:overrideLibrary="com.truecaller.android.sdk" /> <uses-permission android:name="android.permission.INTERNET" /> <application android:allowBackup="true" .... tools:targetApi="31"> <meta-data android:name="com.truecaller.android.sdk.ClientId" android:value="@string/truecaller_client_id" /> .... </application> </manifest> - Create a new activity called LoginActivity and add the below layout. Here we are creating a simple login screen with a button that triggers the truecaller login.
activity_login.xml
<?xml version="1.0" encoding="utf-8"?> <androidx.constraintlayout.widget.ConstraintLayout xmlns:android="http://schemas.android.com/apk/res/android" xmlns:app="http://schemas.android.com/apk/res-auto" xmlns:tools="http://schemas.android.com/tools" android:id="@+id/main" android:layout_width="match_parent" android:layout_height="match_parent" tools:context=".LoginActivity"> <TextView android:id="@+id/title" android:layout_width="match_parent" android:layout_height="wrap_content" android:layout_marginTop="100dp" android:gravity="center_horizontal" android:text="Delivery\nmade simple!" android:textColor="@color/black" android:textSize="30sp" android:textStyle="bold" app:layout_constraintTop_toTopOf="parent" /> <ImageView android:id="@+id/image" android:layout_width="300dp" android:layout_height="300dp" android:layout_marginTop="20dp" app:layout_constraintEnd_toEndOf="parent" app:layout_constraintStart_toStartOf="parent" app:layout_constraintTop_toBottomOf="@id/title" app:srcCompat="@drawable/intro" /> <TextView android:id="@+id/description" android:layout_width="match_parent" android:layout_height="wrap_content" android:layout_marginBottom="32dp" android:gravity="center_horizontal" android:paddingHorizontal="32dp" android:text="Fast, Reliable Delivery at Your Doorstep. Login to get started!" app:layout_constraintBottom_toTopOf="@id/btn_login" /> <Button android:id="@+id/btn_login" android:layout_width="match_parent" android:layout_height="wrap_content" android:layout_marginHorizontal="16dp" android:layout_marginBottom="32dp" android:text="Login with Truecaller" app:layout_constraintBottom_toBottomOf="parent" /> </androidx.constraintlayout.widget.ConstraintLayout> - Open LoginActivity and do the follwing changes. Here
- initTruecaller() method initialises the truecaller SDK by supplying necessary params.
- canUseTrueCaller() method checks whether truecaller can be used on this device or not. If this returns false, you should fallback to other login options.
- If the device supports truecaller login, calling getAuthorizationCode() starts the login flow
- Implement the acitivty from TcOAuthCallback that provides onSuccess(), onFailure() methods to know the status of login.
- Once the login is successful, you will receive the authorizationCode & state in onSuccess().
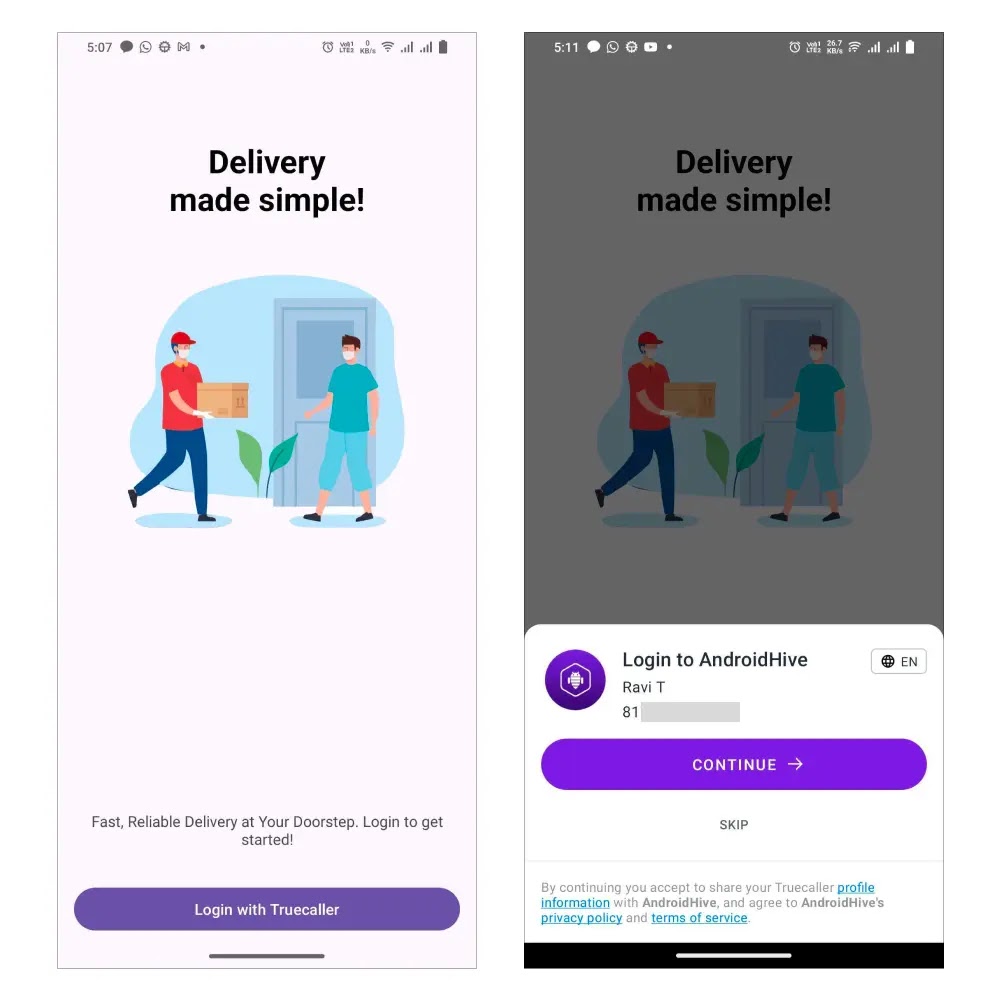
You can run the app now and test it once. If everything is configured properly, you should see below flow.LoginActivity.ktpackage info.androidhive.truecaller_login import android.content.Intent import android.os.Bundle import android.util.Log import android.widget.Toast import androidx.activity.enableEdgeToEdge import androidx.appcompat.app.AppCompatActivity import androidx.core.content.ContextCompat import com.truecaller.android.sdk.oAuth.CodeVerifierUtil import com.truecaller.android.sdk.oAuth.TcOAuthCallback import com.truecaller.android.sdk.oAuth.TcOAuthData import com.truecaller.android.sdk.oAuth.TcOAuthError import com.truecaller.android.sdk.oAuth.TcSdk import com.truecaller.android.sdk.oAuth.TcSdkOptions import info.androidhive.truecaller_login.databinding.ActivityLoginBinding import java.math.BigInteger import java.security.SecureRandom class LoginActivity : AppCompatActivity(), TcOAuthCallback { private val TAG = "LoginActivity" private val binding by lazy(LazyThreadSafetyMode.NONE) { ActivityLoginBinding.inflate(layoutInflater) } private var stateRequested: String? = null private var codeVerifier: String? = null override fun onCreate(savedInstanceState: Bundle?) { super.onCreate(savedInstanceState) enableEdgeToEdge() setContentView(binding.root) binding.btnLogin.setOnClickListener { loginWithTruecaller() } } /** * Method to trigger truecaller login * */ private fun loginWithTruecaller() { // Keeping it in try / catch as it's crashing on few devices try { // init true caller sdk initTruecaller() val canUseTruecaller = canUseTrueCaller() if (canUseTruecaller) { // this will show true caller bottom sheet stateRequested = BigInteger(130, SecureRandom()).toString(32) stateRequested?.let { TcSdk.getInstance().setOAuthState(it) } // requesting profile, phone scopes TcSdk.getInstance().setOAuthScopes(arrayOf("profile", "phone")) codeVerifier = CodeVerifierUtil.generateRandomCodeVerifier() codeVerifier?.let { verifier -> val codeChallenge = CodeVerifierUtil.getCodeChallenge(verifier) codeChallenge?.let { TcSdk.getInstance().setCodeChallenge(it) } ?: Toast.makeText( this, R.string.truecaller_code_challange_error, Toast.LENGTH_LONG ).show() } TcSdk.getInstance().getAuthorizationCode(this) } else { // Can't use truecaller on this device Toast.makeText(this, R.string.truecaller_cant_use_error, Toast.LENGTH_LONG).show() } } catch (e: Exception) { Toast.makeText( this, "Unknown error occurred while login - ${e.message}", Toast.LENGTH_LONG ).show() } } override fun onActivityResult(requestCode: Int, resultCode: Int, data: Intent?) { super.onActivityResult(requestCode, resultCode, data) if (requestCode == TcSdk.SHARE_PROFILE_REQUEST_CODE) { TcSdk.getInstance().onActivityResultObtained(this, requestCode, resultCode, data) } } // returns true if true caller app present in the mobile private fun canUseTrueCaller() = TcSdk.getInstance().isOAuthFlowUsable /** * Initialising truecaller SDK by configuring the custom variables * More info on customisation is here * https://docs.truecaller.com/truecaller-sdk/android/oauth-sdk-3.1.0/integration-steps/customisation * */ private fun initTruecaller() { val tcSdkOptions = TcSdkOptions.Builder(this, this) .buttonColor(ContextCompat.getColor(this, R.color.color_primary)) .buttonTextColor(ContextCompat.getColor(this, R.color.white)) .loginTextPrefix(TcSdkOptions.LOGIN_TEXT_PREFIX_TO_GET_STARTED) .ctaText(TcSdkOptions.CTA_TEXT_CONTINUE) .buttonShapeOptions(TcSdkOptions.BUTTON_SHAPE_ROUNDED) .footerType(TcSdkOptions.FOOTER_TYPE_SKIP) .consentTitleOption(TcSdkOptions.SDK_CONSENT_HEADING_LOG_IN_TO).build() TcSdk.init(tcSdkOptions) } /** * On successful login, send token, state and scopes to your backend and validate the data * More info is here * https://docs.truecaller.com/truecaller-sdk/android/oauth-sdk-3.1.0/integration-steps/integrating-with-your-backend/fetching-user-token * */ override fun onSuccess(tcOAuthData: TcOAuthData) { val state = tcOAuthData.state val token = tcOAuthData.authorizationCode val scopes = tcOAuthData.scopesGranted Toast.makeText( this, "Truecaller login is successful! Token:${token}, State:${state})", Toast.LENGTH_LONG ).show() } override fun onFailure(tcOAuthError: TcOAuthError) { Log.e( TAG, "Truecaller login error. Code:${tcOAuthError.errorCode}, Message:${tcOAuthError.errorMessage}" ) Toast.makeText( this, "Truecaller login error. Code:${tcOAuthError.errorCode}, Message:${tcOAuthError.errorMessage}", Toast.LENGTH_LONG ).show() } override fun onVerificationRequired(tcOAuthError: TcOAuthError?) { Log.e( TAG, "Truecaller onVerificationRequired:${tcOAuthError?.errorCode}, Message:${tcOAuthError?.errorMessage}" ) Toast.makeText( this, "Error! Truecaller verification is required. Error Code:${tcOAuthError?.errorCode}, Message:${tcOAuthError?.errorMessage})", Toast.LENGTH_LONG ).show() } override fun onDestroy() { super.onDestroy() // Release the resources taken by the SDK TcSdk.clear() } }
3. Fetching User Details on Backend
Once user login flow is done, truecaller shares state, authorizationCode in onSuccess() method. You should send these details along with codeVerifier to your backend to verify / fetch user details from truecaller server. More information on this topic can be found hereReferences
- Generating truecaller Client ID - link
- More info on customising the truecaller dialog - link
- Vector image used in this example
Cheers!
Happy Coding 🤗